How to Clean a Flat Lamination Machine
After Using PUR Hot Melt Adhesive
In the world of high-performance bonding, PUR hot melt adhesive has revolutionized flat lamination processes. Its superior strength, excellent heat resistance, and durability make it the go-to choice for demanding applications in packaging, woodworking, and textile industries. However, its greatest strength—forming an unbreakable, cross-linked bond upon curing—also presents its biggest maintenance challenge: cleaning. Improper cleaning can lead to costly downtime, damaged equipment, and poor product quality.
This comprehensive guide will walk you through the correct, efficient, and safe methods to clean your flat lamination machine after using PUR hot melt adhesive, ensuring your equipment remains in peak condition.
Why PUR Adhesive Cleaning is a Unique Challenge
Unlike standard hot melt adhesives, PUR hot melt adhesive is reactive. In its molten state, it is applied like any other hot melt. But once exposed to atmospheric moisture, it undergoes an irreversible chemical curing process. This results in a tough, insoluble, and infusible solid that cannot be simply re-melted away. This is why a proactive cleaning routine is non-negotiable. Every reputable hot melt adhesive supplier will emphasize this critical point
Essential Tools and Materials for the Job
Before you begin, gather the right tools. Using incorrect tools can scratch precision rollers and damage sensitive components.
Personal Protective Equipment (PPE): Heat-resistant gloves, safety glasses, and long sleeves are mandatory.
High-Temperature Scraper: Brass, copper, or wooden scrapers are ideal. Avoid steel scrapers that can score and ruin chrome-plated rollers.
Absorbent Wipes and Cloths: Heavy-duty, non-linting wipes (e.g., cheesecloth or industrial wipers).
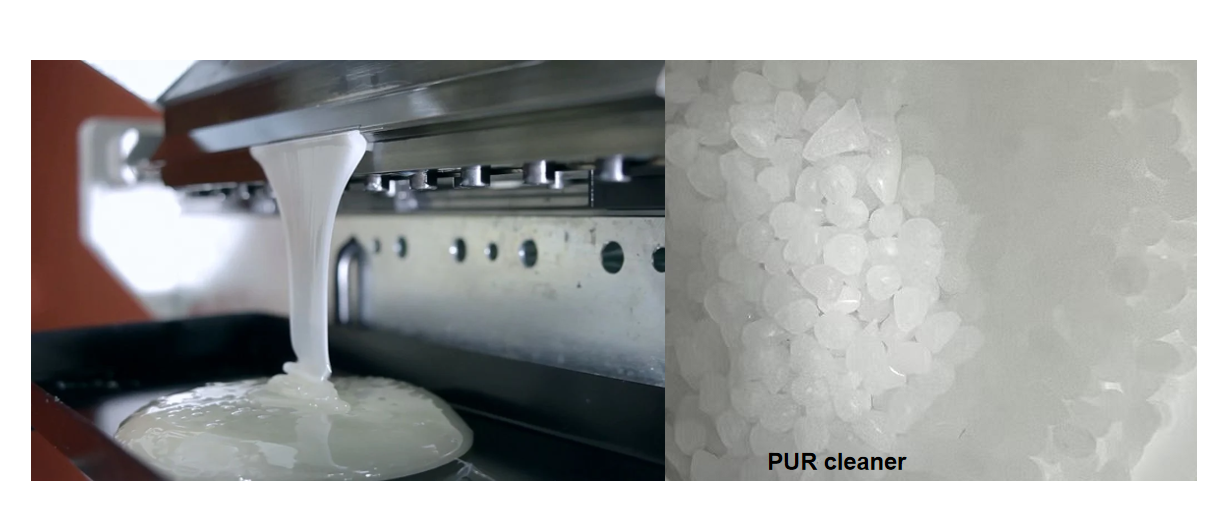
Dedicated PUR Cleaner: This is crucial. A specialized PUR cleaner is formulated to break down and solubilize cured and uncured PUR residue without damaging machine parts, seals, or hoses. Never use aggressive solvents like acetone or paint thinners, as they can degrade critical components and create hazardous fumes.

Step-by-Step Cleaning Procedure
Follow these steps meticulously for a thorough clean. The golden rule is to clean while the machine is still warm, not hot or cold.
Step 1: Initial Preparation and Safety
Shut Down the Machine: Turn off the heating elements and the main power supply to prevent accidental startup.
Allow Controlled Cooling: Let the machine cool down to a handling temperature of around 100-120°C (212-248°F). This is warm enough to keep any uncured adhesive soft but cool enough to handle safely. Your specific PUR hot melt adhesive manufacturer may provide an ideal cleaning temperature—always check their technical data sheet (TDS).
Step 2: Remove Bulk Adhesive
Scrape Gently: Using your high-temperature scraper, carefully remove the bulk of the molten PUR hot melt adhesive from the adhesive tank, applicator head, and rollers. Work methodically to dislodge large chunks. Dispose of this waste adhesive properly.
Step 3: Apply PUR Cleaner and Wipe
Soak and Dissolve: Generously apply the specialized PUR cleaner to all remaining adhesive residues. Focus on the rollers, nozzles, and glue paths. Allow it to soak for 5-10 minutes. The cleaner will penetrate and break down the adhesive's structure.
Wipe Thoroughly: Use your wipes to scrub and wipe away the now-softened residue. You may need to reapply the PUR cleaner and repeat this process several times for stubborn buildup. For intricate parts, consider disassembling and soaking them in a pan filled with the cleaner.
Step 4: Final Wipe-Down and Inspection
Perform a Final Pass: Once all visible adhesive is gone, do a final wipe-down of all surfaces with a clean cloth and a fresh bit of PUR cleaner to remove any last traces or oily film.
Inspect Meticulously: Carefully inspect all components—especially the rollers and applicator nozzles—for any remaining residue. Even a small amount of cured PUR hot melt adhesive can contaminate the next production run and cause bonding defects.
Step 5: Reassemble and Prepare for Next Use
Once you are confident everything is clean and dry, reassemble any disassembled parts.
You are now ready to power up the machine and begin your next production cycle with a different adhesive or a fresh batch of PUR hot melt adhesive for flat lamination.
Best Practices for Prevention and Maintenance
Clean Regularly: The best way to clean is to avoid massive buildup. Perform a basic clean-down at the end of each shift or production run.
Use High-Quality Adhesives: A reliable hot melt adhesive supplier or PUR hot melt adhesive manufacturer will provide consistent, high-quality products with known cleaning characteristics.
Train Your Team: Ensure all operators are trained on the unique properties of PUR hot melt adhesive and the importance of proper cleaning procedures.
Schedule Deep Cleans: Incorporate a periodic deep cleaning into your preventive maintenance schedule.
Conclusion
While PUR hot melt adhesive for flat lamination demands respect during the cleaning process, it doesn't have to be a nightmare. By understanding its chemistry, using the right tools—especially a dedicated PUR cleaner—and implementing a consistent post-production cleaning routine, you can maintain your laminating machine's efficiency and longevity. Investing time in proper cleaning protects your much larger investment in your equipment and ensures the continued high quality of your laminated products. Always consult with your PUR hot melt adhesive manufacturer for their specific recommended cleaning protocols to achieve the best results.
Have Any Adhesive Questions ? Please kindly feel free to contact us for more information.
More than 10 years of experience to answer your questions!


